How to Make an Animated GIF
in Photoshop [Tutorial]
Animated GIFs are great additions to your marketing. They're easy to consume, provide a new way to capture your viewers' attention, and can have a serious emotional impact.

The best part about GIFs is that they aren't too hard to make. If you have access to Photoshop and a few minutes to spare, you can create an animated GIF in no time.
In the following tutorial on making animated GIFs, I'm using the Creative Cloud 2015 version of Photoshop, but the steps should be similar in other versions.
How to make a GIF
- Upload your images to Photoshop.
- Open up the Timeline window.
- In the Timeline window, click "Create Frame Animation."
- Create a new layer for each new frame.
- Open the same menu icon on the right, and choose "Make Frames From Layers."
- Under each frame, select how long it should appear for before switching to the next frame.
- At the bottom of the toolbar, select how many times you'd like it to loop.
- Preview your GIF by pressing the play icon.
- Save and Export Your GIF.
How to Create an Animated GIF in Photoshop
If you already know how to create a GIF, skip to the section on how to use GIFs in your marketing materials.
Here's an example of an animated GIF you might make using this tutorial:
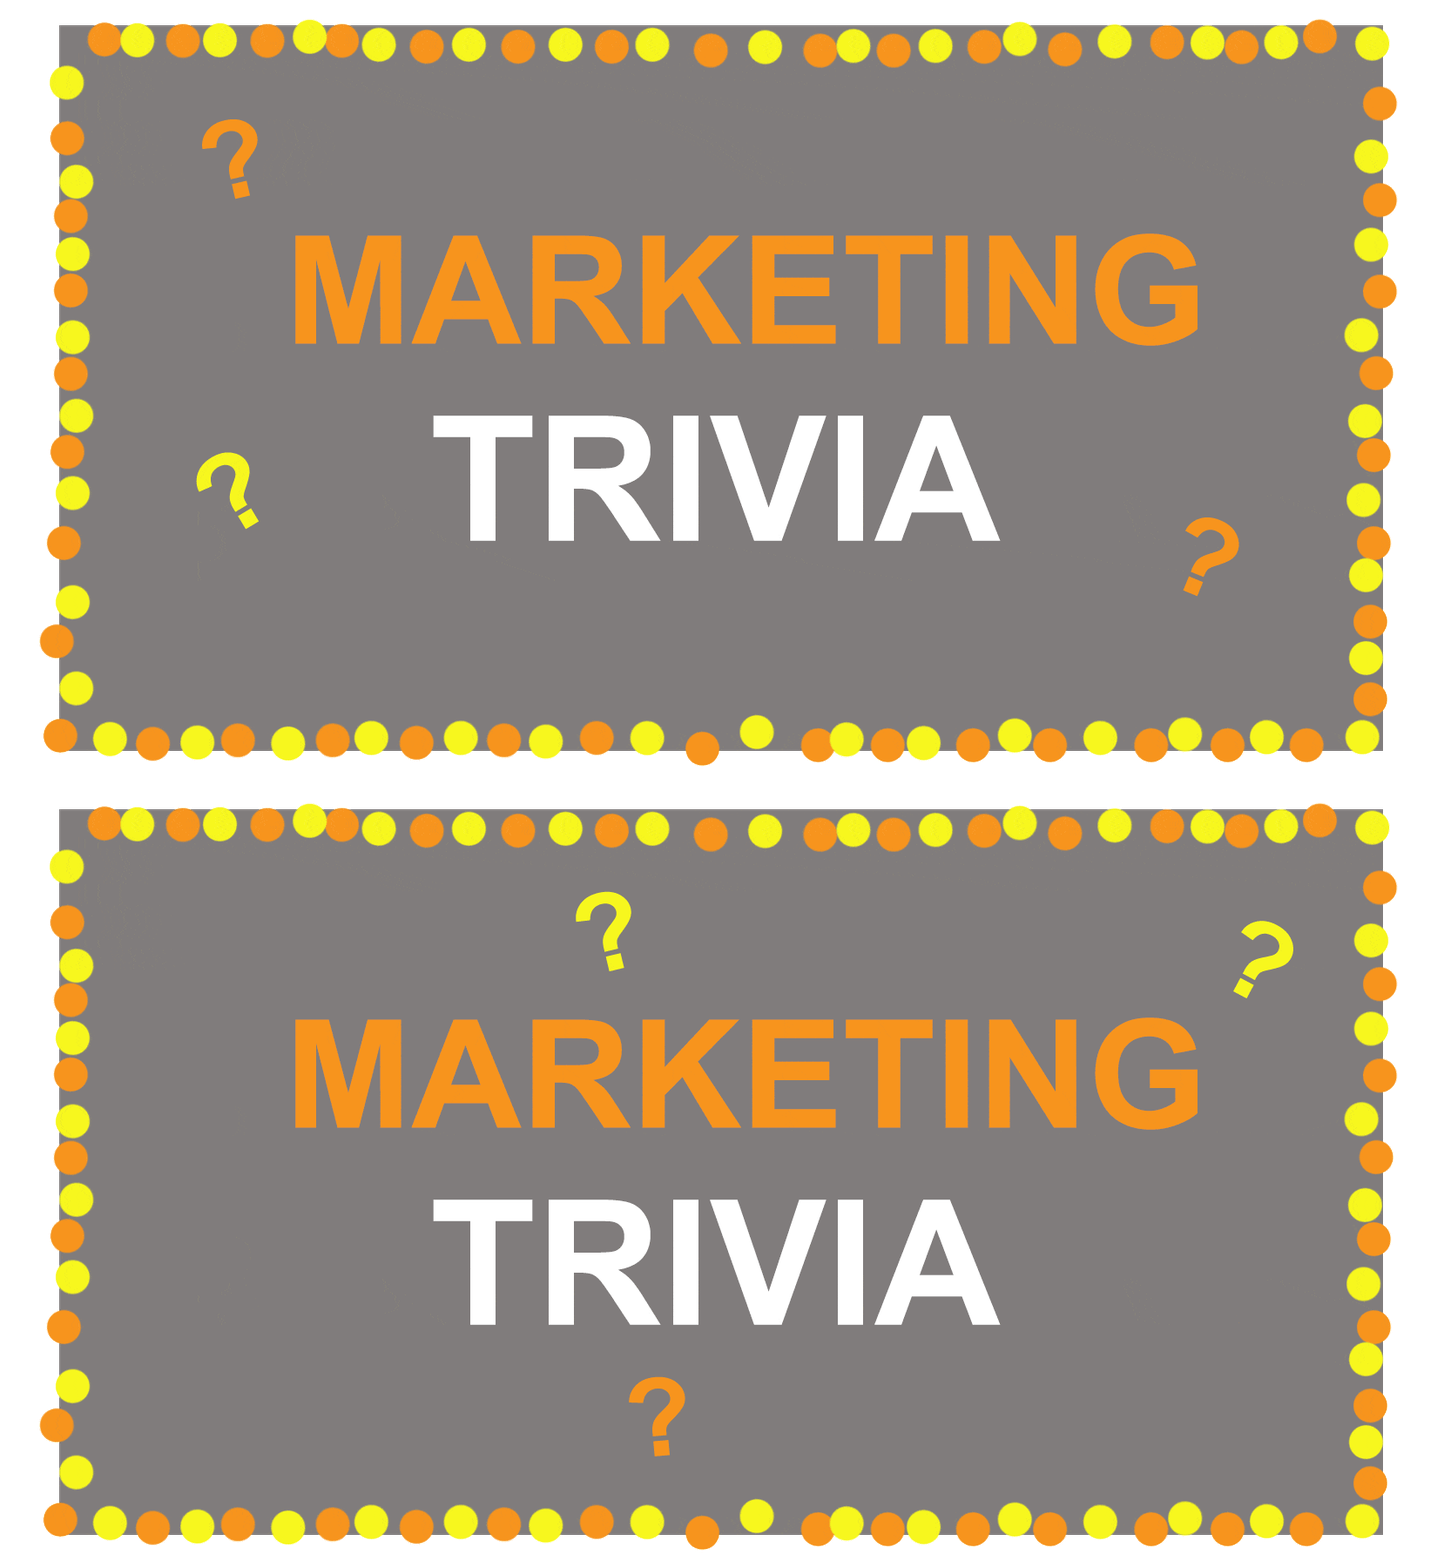 Alright, let's get started.
Step 1: Upload your images to Photoshop.
If you already have images created ...
Gather the images you want in a separate folder. To upload them into Photoshop, click File > Scripts > Load Files Into Stack.
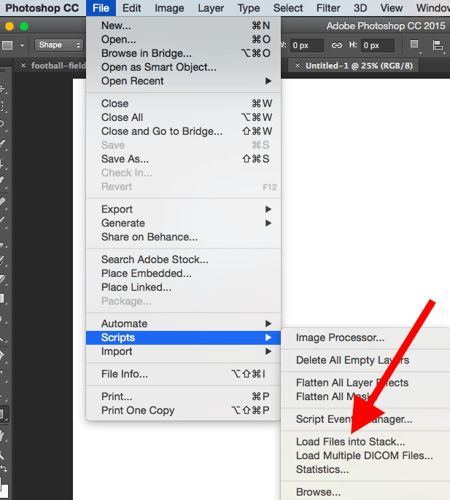
Then, select Browse, and choose which files you'd like to use in your GIF. Then, click OK.
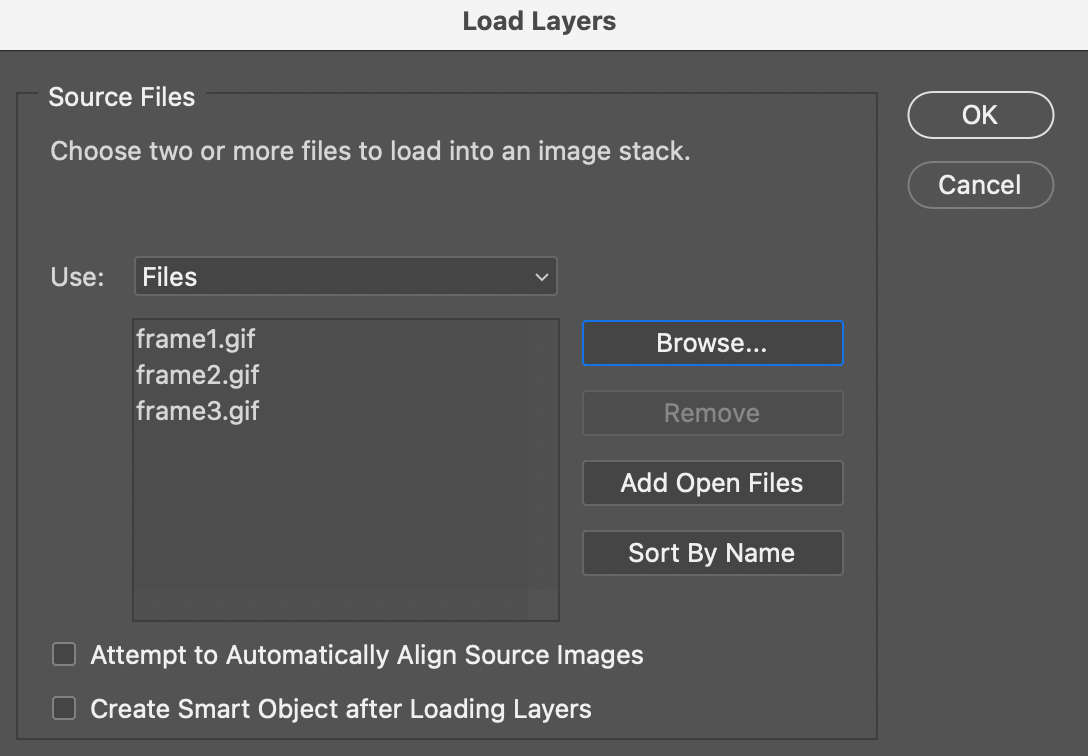 Photoshop will then create a separate layer for each image you've selected. Once you've done that, skip to step two.
If you don't already have the series of images created ...
Create each frame of the animated GIF as a different Photoshop layer. To add a new layer, chose Layer > New > Layer.
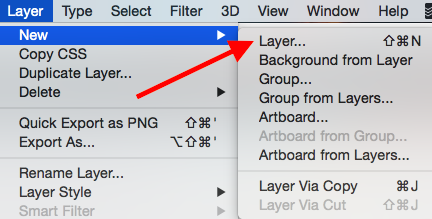
Be sure to name your layers so you can keep track of them easily when you make your GIF. To name a layer, go to the Layer panel on the bottom right of your screen, double-click on the default layer name, and type in the name you want to change it to. Press Enter when you're finished.
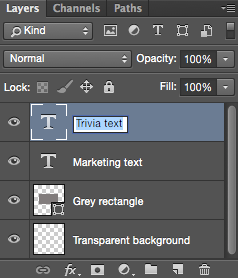
Once you have your layers in there and you've named them all, you're ready for step two.
Pro Tip: If you want to combine layers so they appear in a single frame in your GIF, turn visibility on for the layers you want to merge (by clicking on the "eye" to the left of each layer name so only the eyes for the layers you want to merge are open). Next, press Shift + Command + Option + E (Mac) or Shift + Ctrl + Alt + E (Windows). Photoshop will create a new layer containing the merged content, which you should also rename.
Step 2: Open up the Timeline window.
To open Timeline, go to the top navigation, choose Window > Timeline. The Timeline will let you turn different layers on and off for different periods of time, thereby turning your static image into a GIF.

The Timeline window will appear at the bottom of your screen. Here's what it looks like:
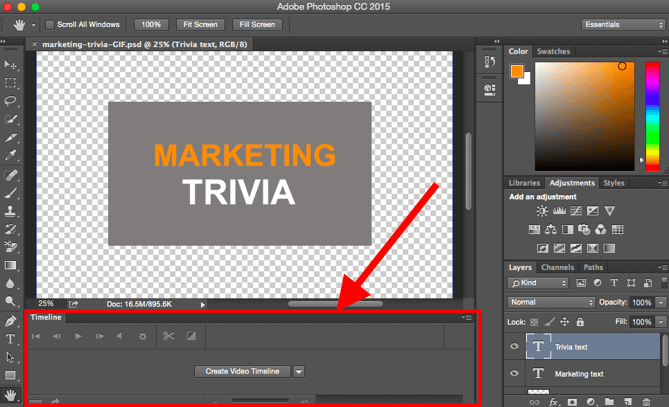
Step 3: In the Timeline window, click "Create Frame Animation."
If it's not automatically selected, choose it from the dropdown menu -- but then be sure to actually click it, otherwise the frame animation options won't show up.

Now, your Timeline should look something like this:

Step 4: Create a new layer for each new frame.
To do this, first select all your layers by going to the top navigation menu and choosing Select > All Layers.
Then, click the menu icon on the right of the Timeline screen.
![]()
From the dropdown menu that appears, choose Create new layer for each new frame.
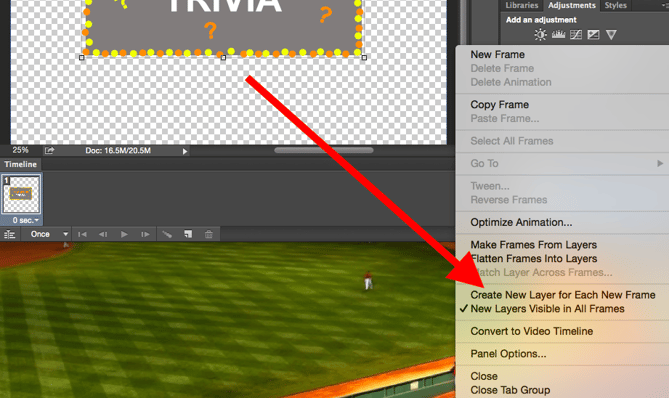
Step 5: Open the same menu icon on the right, and choose "Make Frames From Layers."
This will make each layer a frame of your GIF.
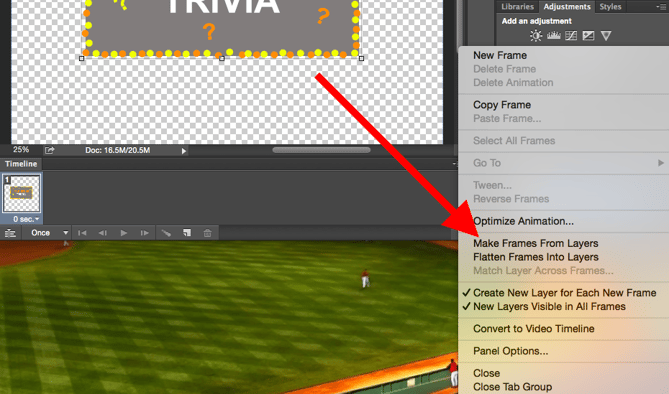
Step 6: Under each frame, select how long it should appear for before switching to the next frame.
To do this, click the time below each frame and choose how long you'd like it to appear. In our case, we chose 0.5 seconds per frame.

Step 7: At the bottom of the toolbar, select how many times you'd like it to loop.
The default will say Once, but you can loop it as many times as you want, including Forever. Click Other if you'd like to specify a custom number of repetitions. 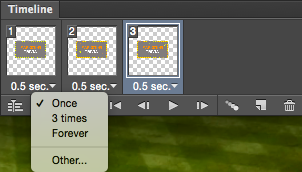
Step 8: Preview your GIF by pressing the play icon.
![]()
Step 9: Save and Export Your GIF
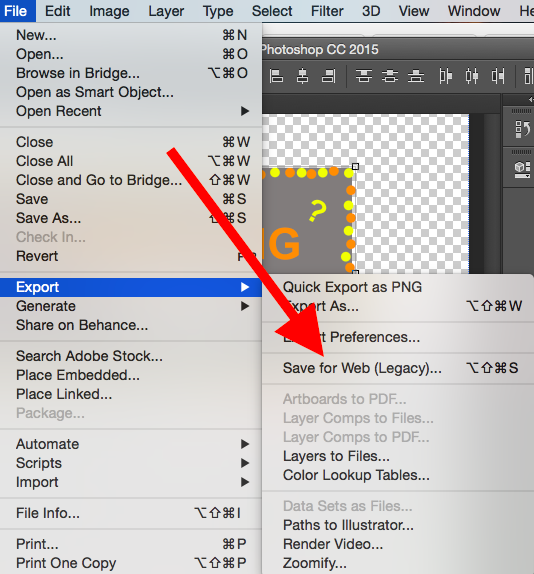
Satisfied with your GIF? Save it to use online by going to the top navigation bar and clicking File > Export > Save for Web (Legacy)...
Next, choose the type of GIF file you'd like to save it as under the Preset dropdown. If you have a GIF with gradients, choose Dithered GIFs to prevent color banding. If your image employs a lot of solid colors, you may opt for no dither.
The number next to the GIF file determines how large (and how precise) the GIF colors will be compared to the original JPEGs or PNGs. According to Adobe, a higher dithering percentage translates to the appearance of more colors and detail -- but it increases the file size.
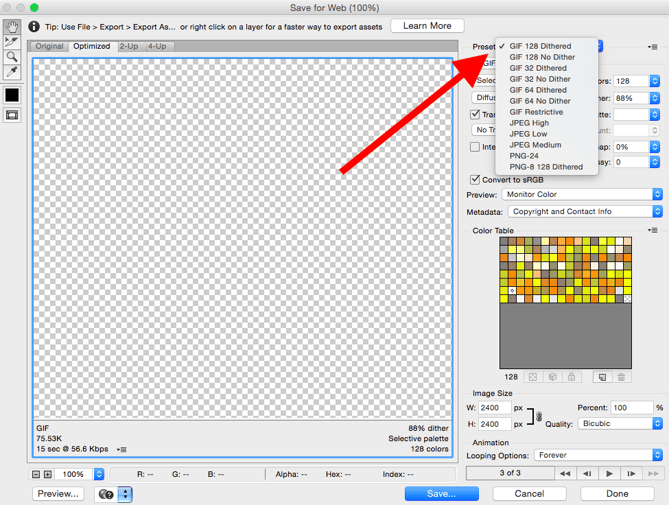
Click Save at the bottom to save the file to your computer. Now you're ready to upload this GIF to use in your marketing!
Upload the GIF file into any place online that you'd put an image, and it should play seamlessly. Here's what the final product might look like:

 Now Use GIFs in Your Marketing